
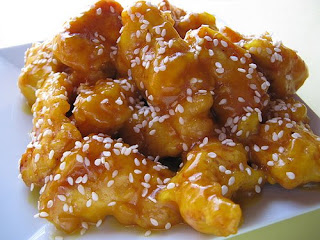
Also be sure to Sweet and Sour, Kung Pao Chicken and Orange!
No doubt this is the favorite food of my family. I developed this method of cooking chicken in order to mimic the Pei Wei Honey Chicken and Panda Express Orange Chicken, but without the fat to fry. I love this recipe because it's quick and easy, and because this method of cooking chicken is low in fat, but tastes so good. For cooks like me who sometimes forgot to remove the chicken from the freezer in time, I should mention that you are my honey chicken or frozen chicken parts (I know because I've done many times). Another advantage is that you use the same method to do all kinds of different foods. In fact, I often cook the chicken and then 2-4 different dishes at once. You can also use this method of cooking chicken Orange Chicken, Kung Pao, sweet and bitter! If you do not like chicken, or want some variation in the flesh, you can also use pork. Give instructions for the following variations.
Honey Chicken
1-2 pounds chicken or pork cut into 1 "(frozen or deep frozen, some is OK)
1/4 cup and 1/2 of corn flour (flour is also used, but is not as crisp)
A tea. Garlic, salt
1/2 tea. ground ginger (optional - is a stronger taste of Asia, but my kids do not like)
1/3 cup and 1/2 of honey (not really measure, but just pour into the mold until the sauce has so much as I want)
Photos by step instructions picture.
First Diced chicken on the cutting board.
Second Sprinkle the meat with the cornstarch. Mix until all pieces are covered.
Third Heat the pan and take the chicken (you can add a little oil if you like, but do not really need).
4th Stir and fry until chicken is just done through. This takes about 7 minutes. If you cover the pan, you can go faster, but the chicken is not as crisp. Even if the chicken is frozen, it takes a little longer and not as crisp.
5th As the chicken is done (not usually measured, but only from the container, pour the honey) honey, pour sauce or another. Cook until it begins to bubble.
6th Serve over rice or noodles (see recipe below).
7th You can save for later reheating and still tastes very good, despite the loss of the crispy skin.
Variations:
First Orange Chicken: Cook, as above, but put on Panda Express Orange Chicken Sauce (or other orange chicken sauce) instead of honey.
Second Kung Pao Chicken. Chicken cook as above. When just cooked, place in a bowl. Saute 1 cup onion and 1/2 cup chopped bell pepper (I like red and green color). Place chicken on a plate. Place 1/2 cup peanuts or cashews in a frying pan and fry until you get a good flavor. Place the chicken mixture, onion and bell pepper to the pan and mix. Pour the sauce over commercial or Kung Pao with my homemade version (very good!).
Kung Pao sauce
In a small bowl, mix:
1 1/2 TB soy sauce
2 tb Sherry
A tea. Chicken broth
1TB of vinegar (red or rice)
2 tea. Sugar
A tea. Ginger
1 TB cornstarch
Pour the chicken, onion, bell pepper and mix peanut / cashew and cook until thick and champagne.
Third Sweet and Sour. Chicken cook as above. Place in a bowl. Saute 1 cup onion and 1/2 cup chopped bell pepper (I like red and green color). Place chicken on a plate. Boil 1 cup fresh pineapple (which is nice, but works well preserved). Add chicken mixture to give back, onion and bell pepper to the pan and mix. Pour into a jar of sweet and sour sauce. Cook until bubbling and serve over rice.
Perfect rice
Of course, if you have a rice cooker, you can do it, but a Chinese friend of mine told me how to cook rice perfectly years ago, and it always works.
2 cups water
1 cup rice
A tea. Salt
Bring some water and salt in a saucepan. When the water boils, put the rice and stir. Reduce heat and the pot. Setting the timer to 18 minutes. When the rice before cooking the chicken should begin right at the same time be carried out - dinner in under 20 minutes!
Simple Noodle
3 cups cooked Chinese noodles or spaghetti
1 tb sesame oil (or vegetable oil)
1-3 cups chopped vegetables such as onions, bean sprouts, shredded carrots, Chinese cabbage, water chestnuts or bamboo shoots (I use what I have in the fridge or the cupboard!)
Mix the sauce: 2 TB soy sauce, chicken broth 2 TB, 2 TB sherry or other wine
Oil in skillet. Add cooked noodles and stir until hot. Place the noodles in a bowl. Add vegetables to the pan (thicker at first) and fry until almost cooked. Place the noodles and then mix and cook until vegetables are just done. Pour the sauce mixture and cook until bubbles. Serve alone or with honey chicken on top.


Why are the muffins are the best!
Cupcakes are best because they have this time of the cake, but you can on a personal level. Never feel like you ate too much with a cupcake, but a piece of cake can sometimes be overwhelming or too difficult.
Muffins, either vanilla, chocolate or any combination of the two are. Cupcakes are good in both directions. If you have to feed a group, make cupcakes that everyone knows how they get their fair share. With a little cake, anyone can make a rose ....
Depending on how you can decorate cakes from casual to go from simple to elaborate, from children's birthday parties, weddings and gala balls.
For starters I have a vanilla cupcake, a dairy and a special cake recipe egg free, including one for chocolate coating.
Cupcakes vs. Muffins - Blogger solve the puzzle
All cakes, all the time: Muffins vs. Cupcakes Redux
The quick and dirty answer to that is that cupcakes have frosting, whereas muffins do not. But in the research, I found an excellent definition of the difference formulas ...
Super-vanilla cupcakes
Ingredients:
1 3/4 cups cake flour, not yeast
1 1/4 cups unbleached flour
2 cups sugar
1 teaspoon baking powder
3/4 teaspoon salt
1 cup (2 sticks) unsalted butter, cut into 1 inch cubes
4 large eggs
1 cup whole milk
1 teaspoon pure vanilla extract
Start preheating the oven, setting it to 325 degrees.
Get your small cake pans prepared by lining with paper liners.
Implementation of your electric mixer with the paddle. Use this function to combine the flour, salt, baking powder and sugar, mixing at low speed. Then add the butter a few cubes at a time and let it mix until the butter covered with just flour, then stop the mixer.
Well, in a separate container of vanilla extract, milk and eggs, stirring. Turn the mixer back in the middle and slowly pour in wet ingredients. Use a spatula to scrape down sides of bowl as you pour this part in. Do not over beat the batter.
Use a spoon or small cup with a peak measurement to fill muffin tins. Fill each cupcake shirt will increase only two-thirds or cupcakes too far when they burn and bake in the tray.
The cupcakes should be about 17-20 minutes. Half of cooking, rotating the mold in the oven. Muffins test if carried out by driving a stick in the center of the bottom of some of them. They want to see, does not stick the stick "clean" with the dough, it will.
This recipe makes about 30 cupcakes.
When muffins are done, they turn to guns and let sit finish cooling on rack. NOT FROST cake until completely cool. Otherwise, the glaze melts and drips to the right of the cupcake.
Serve small cakes at room temperature. Store in sealed plastic or covered in the refrigerator. Eat within three days for best texture and freshness.

Thit Xa Xiu
Char Siu Pork, literally pork is fork in Southeast China. Now is a favorite of all parts of Asia. It describes the method of hanging strips of marinated pork on a spit and roast in the oven or over an open fire. Char Siu Pork is Cantonese, Mandarin or in Cha Shao Thit Xa Xiu in Vietnamese. We are on the way to China, China's Thit Xa Xiu is an important influence on Vietnamese cuisine. Enjoy XOI (sticky rice), simple steamed rice, soup noodles, lo mein, fried rice, wok dishes, Bao (steamed bread, salad, and countless other dishes.
You can see pork in many, if not all Asian restaurants to win most probably due to the red food coloring customers' attention to. The contrast could not be more harmful than that of M & Ms or candy, but never really know what's happening in the kitchen. So, if you be sure that no dye gets into your roast pork Chinese style will be the best solution would be to prepare his home. Thit Xa Xiu I prefer, since I'm familiar with it.
Here's how to solve Thit Xa Xiu at home. This recipe omits red food dye color, but juicy and tasty Asian-style pork barbecue. I could not with the eyes cathcing store or restaurant bought Thit Xa Xiu compare, but I can guarantee that this is the best. If you prefer a little red, then you can add 4 to 5 tablespoons of tomato sauce for this recipe.
What you need
2 1/2 pounds boneless pork Sholder, well trimmed
Pickle
3 teaspoons sesame oil
1 1/2 tablespoons dark soy sauce
2 1/2 PDD ligh soy sauce
2 tbsp Chinese rice wine or dry sherry
2 garlic cloves, finely chopped
3 tablespoons honey
3 tablespoons hoisin sauce
1 teaspoon Chinese five-spice powder
2 tablespoons sugar
How to Fix
Cut the pork into strips about 2 inches thick and 6 inches in length.
In a bowl, combine sesame oil, soy sauce, soy sauce, rice wine, garlic, honey, hoisin sauce, five spice powder and sugar. Then add pork slices and stir well to coat evenly. Cover with plastic and WRAT put in the refrigerator 8 hours or up to 24 hours. Occasionally pork rotate to ensure that it is covered with the marinade.
An hour before grilling, remove pork from the refrigerator. Preheat oven to 475 F and place rack in upper third of oven. Place a roasting rack with aluminum foil-lined baking sheet. Place the pork slices and on the shelf. Leave about 1 inch between them. Keep the marinade, as it is to be used for basting.
Roast pork slices for about 30 minutes. Every 10 minutes, use tongs to pick up each pork slices and then bathe and role int the marinade. Back up to the grill and turn the pork slices in each moment. When the meat is charred slightly glazed and read at 145 F, which are carried out. Remove from the oven. Rest for 10 minutes to seal the juices.
Cut pork crosswise to the fiber. Place on serving platter. Hot or at room temperature. To freezing, wrap them securely in plastic and thrombosis sit in the freezer. You can freeze up to 3 months. To serve, reheat in the microwave.
Classic Chocolate Truffle
Labels: Chocolate
8 ounces semisweet chocolate, finely chopped (or chocolate)
1/2 cup whipping cream
2 tablespoons butter, cut into cubes
1/2 teaspoon vanilla
Chopped nuts, cocoa powder, coconut, sprinkles, etc for coating truffles
Place the chopped chocolate in a large glass bowl. Heat cream and butter in a medium saucepan over medium heat just to scalding. Remove from heat as soon as the cream begins to boil, do not boil. Pour the cream over the chocolate and let stand for one minute to soften chocolate. Add vanilla and stir until the chocolate is completely smooth. Pour chocolate mixture into a casserole dish 9-inch square. Refrigerate for an hour or until chocolate is set, like fudge, but still able Scoop.
In the meantime, prepare your coatings truffles. Toast the nuts and coconut, if desired. Enter the desired ingredients in small bowls, shallow and mount against him. Remove the chocolate filling from the refrigerator. Using a small cookie scoop, chocolate making into balls, flatten against the side of the middle your baking dish. Roll truffles in desired coatings and wax paper on a baking sheet lined. Store in an airtight container in refrigerator up to two weeks. Makes 20-30 truffles, depending on size.
Some tips and suggestions. . .
I like to use all semi-sweet chocolate, milk or sour but if you prefer, that's fine too. You can even find a combination.
If you have a small cookie scoop, I recommend always before truffles. I made truffles with all kinds of devices to collect, and cookie scoop is the way to go! I think it helps me with a paper towel, rinse and truffles every 5 or so to dry. With a spoon actually reduces the clutter in rolls of truffle with your bare hands (which can still be done if you want perfectly round truffles) are involved. I like the flat bottom, though - they fit perfectly into small paper cups and cute!
If you let your chocolate in the fridge too long and find it difficult to remove, just let it come to room temperature and try again. Also, you have to press any fear Carefully layers in truffles, if you do not seem to hold.
You can dip chocolate truffles, if desired. You probably want to make them smaller than the size of the ball cookies if you go this route. I tend to make a big mess when dipping in chocolate, so I always roll mine in the coatings. It's also fun to choose different sprinkles on various festivals and celebrations reflect.
You can flavor your truffles (mint, orange, raspberry, etc.) by replacing the vanilla with different extracts.
If you saved your truffles in the refrigerator, it will taste better if you bring them to room temperature before eating (if you wait that long).
If I intend to give these have usually double the recipe. Four or five of these homemade truffles in a nice little box makes a thoughtful Valentine's gift and delicious! Happy Valentine's Day!
Molten Mocha Cakes
Labels: CAKE
ingredients
For 2 people
2 tablespoons butter, a little more for molds
1/3 cup powdered sugar, plus more for serving and molds
2 ounces semisweet chocolate, chopped
1 large egg
1 large egg yolk
1 teaspoon coffee powder
A pinch of salt
3 tablespoons flour
instructions
Preheat oven to 400 degrees. Butter two 6-ounce molds, and then sprinkle with sugar. Butter and chocolate in a microwave safe bowl. Microwave on high in 20 second increments, stirring after each, until melted. Allow to cool slightly.
Meanwhile, in a small bowl, mix egg yolks, sugar, coffee powder and salt. Add the chocolate mixture, whisk to combine. Flour and beat until combined (do not overmix). Pour into prepared pans. (Recipe can be prepared ahead to this point.)
Bake until toothpick inserted 1/2 inch from edge of mold comes out clean, and a toothpick inserted in center comes moist, 10 to 12 minutes (do not overbake). Cool 10 minutes, cool on wire rack. Run a knife to loosen within the molds. Invert cake onto a plate for expansion. With sugar and serve immediately.
Spicy shrimp
Labels: Seafood
This spicy shrimp recipe is basically prepared with a spicy tomato sauce. You can garlic sauce, spicy tomato sauce, add a little sweet and spicy. It is usually served with fried rice, but also knows when served with any kind of pasta and spaghetti.
ingredients:
1 pounds large shrimp (clean)
1 tablespoon olive oil
1 onion (chopped)
2 garlic cloves (finely chopped)
15 ounces tomatoes (drained)
2 teaspoons dried oregano
1 teaspoon dried basil
½ teaspoon dried thyme
¼ teaspoon red pepper flakes, crushed
1 teaspoon cayenne pepper
Salt and pepper to taste
1 tablespoon chopped parsley
procedure:
First Saute onions and garlic in olive oil for 3-4 minutes until soft.
Second Add shrimp and cook for 2-3 minutes until shrimp has just turned pink.
Third Place shrimp in tomato mixture and cook plate, oregano, basil, thyme, ground pepper, pepper, salt and pepper over medium heat until the sauce begins to boil.
Third Simmer 5-8 minutes, then let you add the shrimp mixture into the sauce. Simmer again for 2 minutes more and then top with fresh parsley.
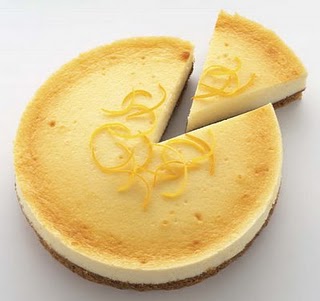
Being diagnosed with diabetes usually means a change in lifestyle and diet. I have a terrible sweet tooth - If you're like I had this vision of all things sweet and good to disappear from my diet. Imagine my surprise to discover that not true. In fact, doctors and nutritionists recommend eating fresh fruit. And there are many ways to make delicious desserts for diabetics. As with all foods, we have seen our share and more diabetic candies. Do not make this cheese cake and eat it all before bedtime! However, incorporated into a healthy diet, you should be able to enjoy it. With its sugar-free ingredients and fresh fruit is healthy and tasty for everyone!
LEMON CHEESE diabetic
1 1/4 cracker crumbs *
1/4 cup Splenda granular
1/3 cup melted butter
1 package (3 oz) sugar-free lemon gelatin mixture
2/3 cup boiling water
2 bars (8 ounces each) cream cheese
6-oz lite / firm tofu
Zest of 1 lemon
Juice of 1 lemon
Sugar 1 cup whipped cream frozen, thawed
Fresh fruit of your choice, optional
In a small bowl, mix cookie crumbs, Splenda, and melted butter until well blended. With the back of a large spoon, press mixture into bottom and sides of an 8 inch pan. Chill the crust for about ten minutes.
In a blender mix the gelatin mixture of lemon and hot water, slowly add the cream cheese and tofu. Continue mixing until smooth. Divide the dough into a large bowl and add the lemon zest, lemon juice and fill thawed. Pour mixture into prepared pan, smoothing top. Cool for 4 hours or more. Before serving, garnish with whipped cream and fresh fruit / fruit of your choice, if desired.
* If you can not use cracker crumbs crumbs made their butter cookies without sugar or sugar-free vanilla wafers.
12 servings.